
Using BrinPage CPM after installation
Once CPM is installed and connected to your BrinPage Platform account, the dashboard becomes your control panel for how your AI behaves. You will mainly work with two areas: Context Modules and API Management.
This page walks you step by step through how to create and manage context modules, and how to configure and monitor your API provider, models, and usage.
Don’t have a license yet? Create a BrinPage Platform account and generate your API key.
Get your API keyThe two main areas of the CPM dashboard
After installation, you'll see two main tabs in the CPM dashboard:
- Context Modules – where you define the Base prompt and add modular context blocks that the AI can pull in when certain keywords appear.
- API Management – where you configure your provider (e.g. OpenAI), choose language and embedding models, set temperature, and review usage metrics.
1. Working with Context Modules
The Context Modules tab is where you structure the information and rules that your AI will use. When you first open it, you will see only one card: your Base prompt. As you create more modules, they appear both in the list on the right and in the graph on the left.
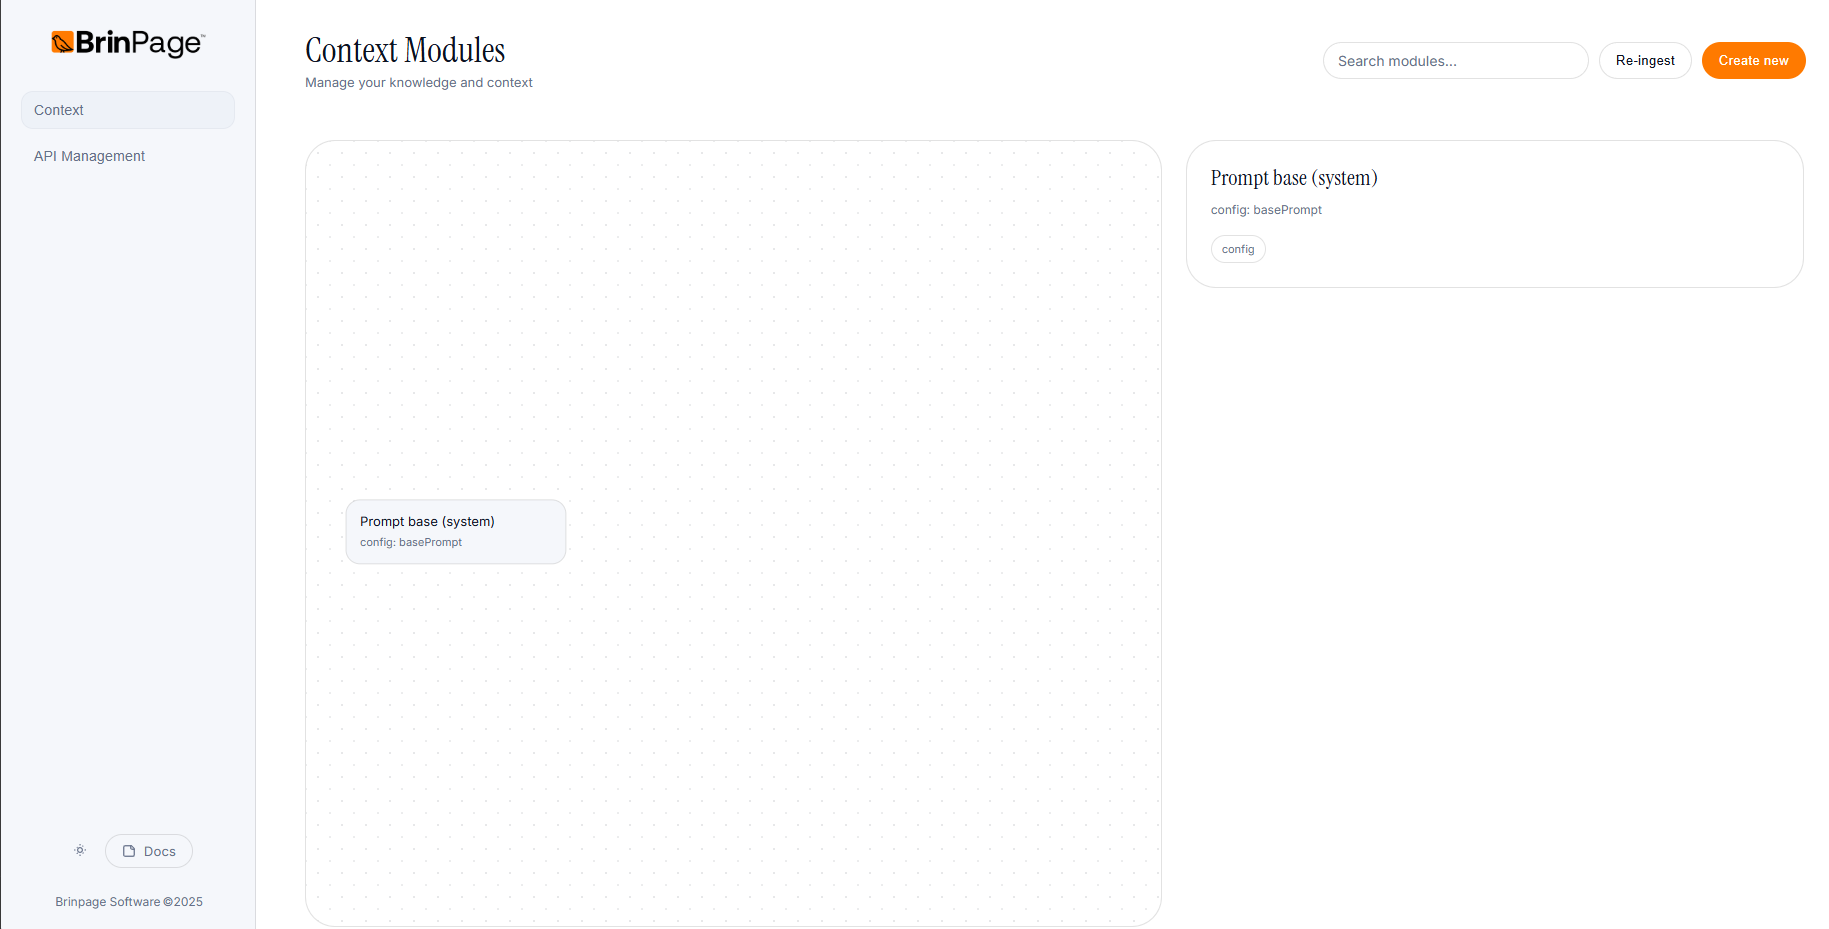
1.1 Editing the Base prompt
The Base prompt is the foundation for all conversations. It usually defines the assistant's role, tone of voice, and global rules.
- Open the Context Modules tab.
- Locate the card corresponding to the Base prompt.
- Click the card to open its details and edit the Content (Markdown)with your global instructions.
- Save your changes to update the Base prompt in the dashboard.
1.2 Creating your first context module
Context modules are reusable blocks of instructions or domain knowledge. They are triggered when the user's message contains one of the keywords you define.
To create a new context module:
- Stay on the Context Modules tab.
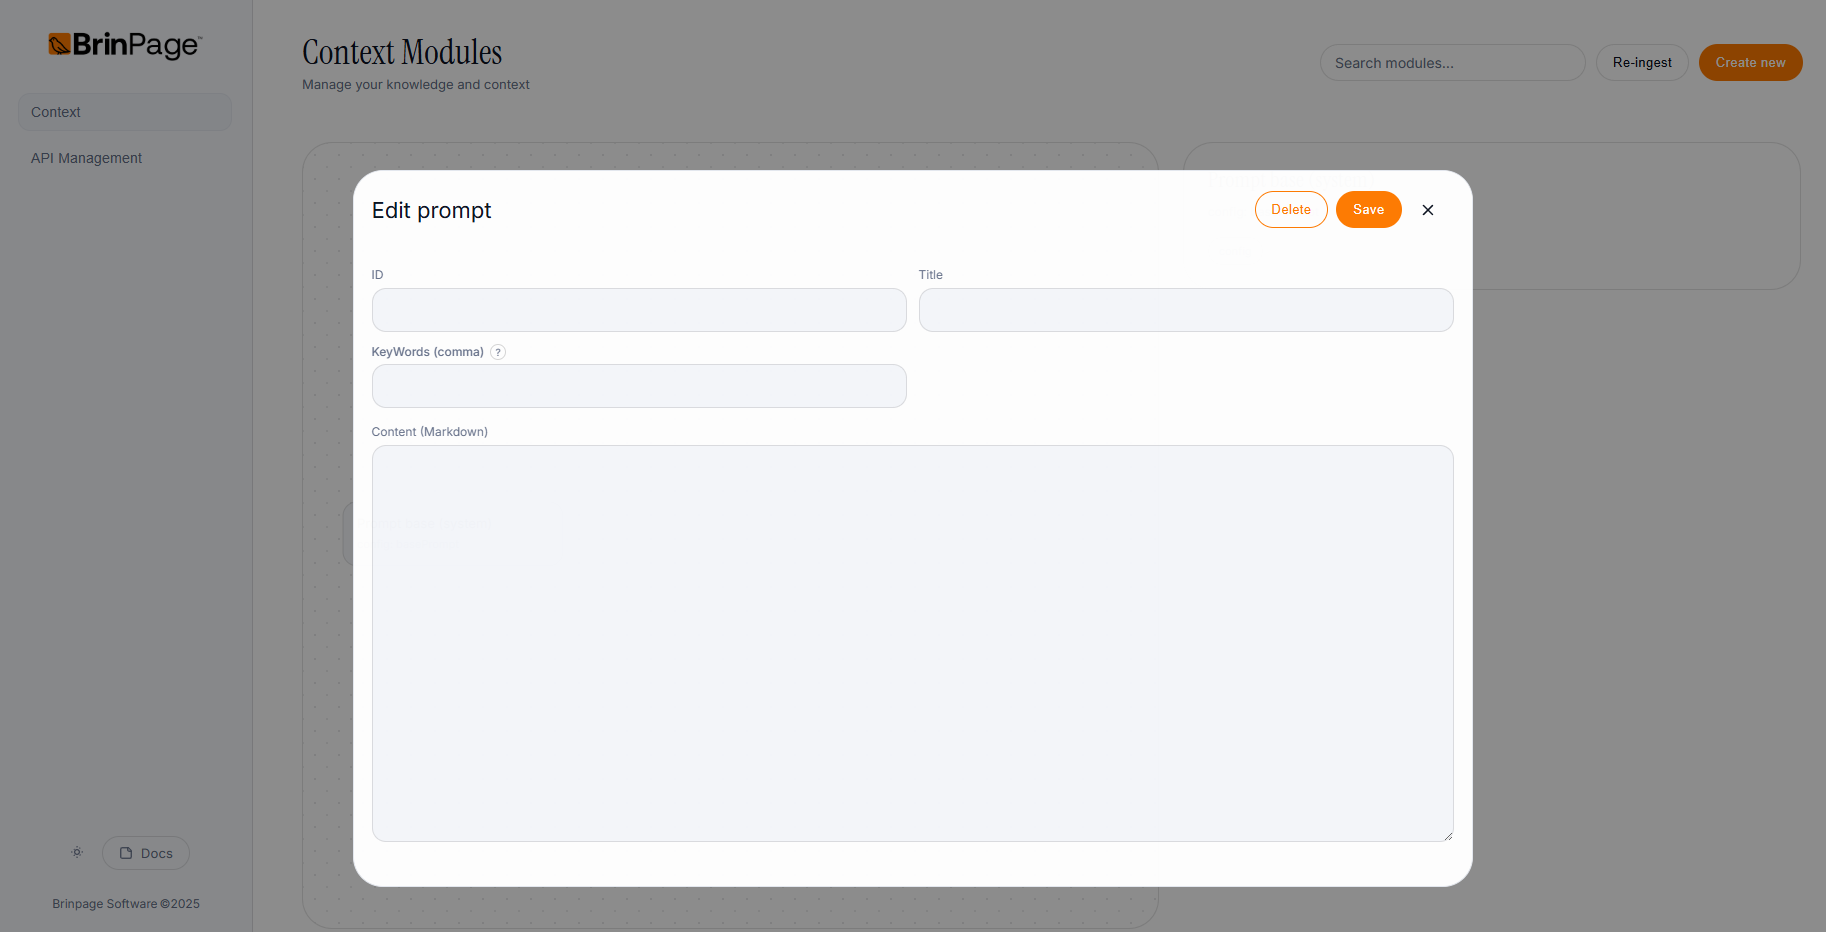
- Click the button to create a new module. A popup will open with four fields:
- ID – A purely identifying value that helps you organize your prompts. You can use any convention you like, for example:
e.g.context-1,payments-faq,onboarding-rules - Title – A human-friendly title that makes it easy to find the module later in the list, for example:
e.g.Information about payments and pricing - KeyWords (comma) – A comma-separated list of keywords that should activate this module when the user types them. For example:
price, services, budget, payment
When one of these words appears in the user's message, the AI will pull this context into the prompt. - Content (Markdown) – The actual instructions or information for this module, written in Markdown. This can include:
- Product or service descriptions.
- Process explanations (e.g. how billing works).
- Specific rules or constraints the AI must follow.
When you have filled all fields, click Save. The module will appear:
- In the list on the right, as a new card you can select and edit.
- In the graph on the left, so you can visually see how it fits into your prompt configuration and navigate by dragging around the graph.
1.3 Managing existing modules
As your project grows, you can keep your context organized by regularly maintaining your modules.
- Edit a module – Open the module from the list, adjust any field (ID, Title, KeyWords, or Content), and save again.
- Delete a module – Use the delete option on the module when it's no longer needed, so it doesn't appear in the graph or in the list.
- Navigate your graph – Drag around the graph on the left to explore how your modules are distributed and understand your overall context structure.
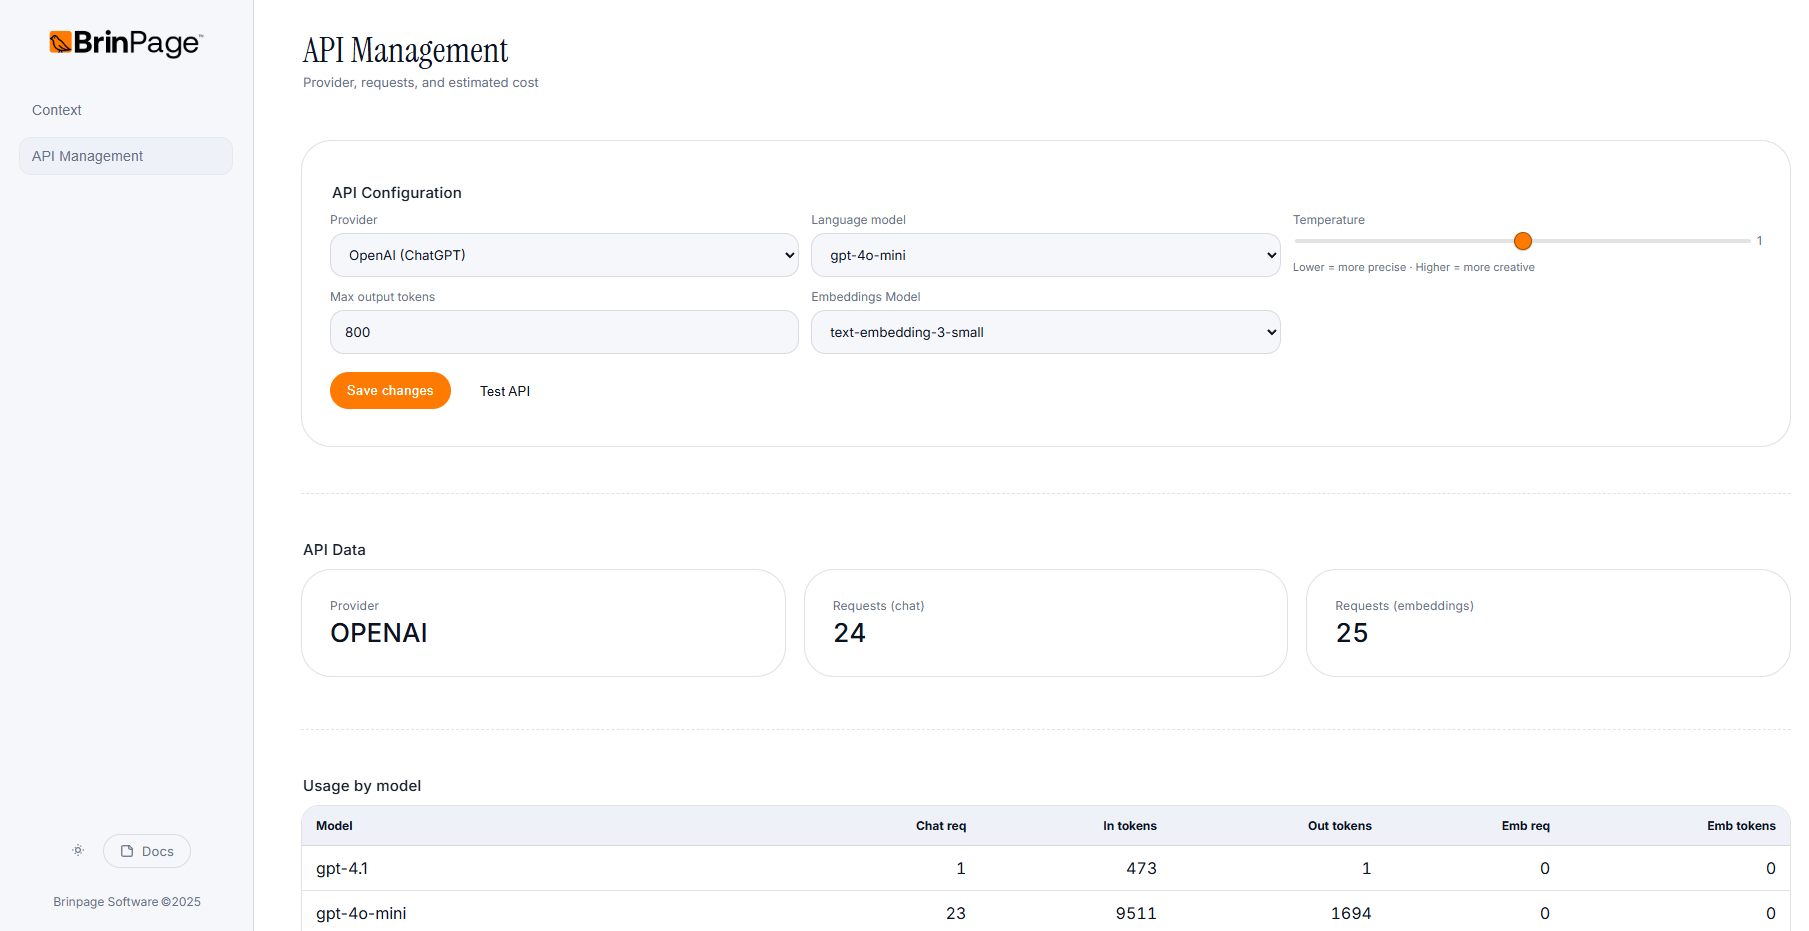
2. Configuring API Management
The API Management tab lets you define which provider and models CPM will use, plus how the AI should behave in terms of creativity, length, and embeddings.
2.1 API Configuration
In the API Configuration section you will see fields similar to:
- Provider – e.g.
OpenAI (ChatGPT) - Language model – e.g.
gpt-4o-mini - Temperature – A slider with the note:
"Lower = more precise · Higher = more creative" - Max output tokens – e.g.
800 - Embeddings Model – e.g.
text-embedding-3-small
To update your configuration:
- Open the API Management tab.
- Select the desired Provider and Language model.
- Adjust the Temperature according to your needs:
- Lower values → more deterministic, precise answers.
- Higher values → more creative, exploratory answers.
- Set the Max output tokens to control maximum reply length.
- Choose an Embeddings Model for semantic search and RAG.
- Click Save changes to persist your configuration.
There is also a Test API button that lets you quickly verify if the configured provider is working. When the test succeeds, you should see a confirmation such as "API OK ✓".
3. Monitoring API data and model usage
Below the configuration, the API Data section gives you a quick snapshot of how your project is using the provider.
3.1 API Data overview
In API Data you can see fields like:
- Provider – The provider currently in use.
e.g.OPENAI - Requests (chat) – Total number of chat requests sent.
e.g.331 - Requests (embeddings) – Total number of embedding requests.
e.g.344
3.2 Usage by model table
At the bottom, you will find a Usage by model table that breaks down how each model is being used. The columns include:
- Model
- Chat req
- In tokens
- Out tokens
- Emb req
- Emb tokens
For example, you might see a row like:
| Model | Chat req | In tokens | Out tokens | Emb req | Emb tokens |
|---|---|---|---|---|---|
| gpt-4.1 | 2 | 620 | 46 | 0 | 0 |
This makes it easy to understand which models are actually being used, how many tokens they consume in input and output, and whether embeddings are contributing significantly to your overall usage.
Next steps
At this point you know how to structure your context and how to control your provider configuration and usage from the CPM dashboard. The next step is to connect this setup to your application code and start using CPM in real requests.